In the gathering process of my foray into polymer work, I have amassed a fair number of tools. Yes, I am a tool junkie. Always looking for leaf shapes, I have now accumulated a huge number of leaf cutters, and a small number of molds...you know...the large flexible vinyl sheets with attractive shapes that you are supposed to be able to press clay into, and get wonderful molded identicals of. Today I had a three step learning process that you will get a kick out of. I wish I had pictures to go with this, but am certain that when I share my experience, you will nod, smile, and/or laugh out loud....at right at me... yourself------ or both of us! I am still laughing. It is always such a rich pleasure when ingenuity wins over an obstacle.
I avoided those tray style press molds for months. I kept thinking, sure, conceptually the idea is great, but how am I going to get a lump or sheet of clay pressed into that wonderful leaf mold, get rid of the excess clay, and retrieve the clay from the mold that I am attempting to reproduce!
First, I rolled out a small sheet of clay...perhaps 3inches by 3 inches and layed it over the mold, pressed the clay into the mold, grabbed one edge and pulled the clay away from the leave mold and wow! The leaf is gorgeous...in the middle of that little lake of green clay. It has serrated edges, or ruffled edges, or lots of tiny curved edges. What the heck! Am I supposed to cut that with a craft knife...maybe..ok....I'll give it a go. A craft knife was not a good plan. Impossible to navigate all of the fine edged details, I got a less than satisfactory result and before I could even finish extracating my leaf, I switched over to a pair of scissors, picked up the leaf gently between my fingers, and attempted to cut my leaf out. This didn't work out either. Finger prints in the clay and still unable to negotiate all of those tiny curves and serrations with the scissors. I layed the whole mess down and had a major think.
Finally, I pressed the clay into the flexible mold: trimmed away the bulk of the excess around the edges with a craft knife, but never getting into the edge. Then, with a straight bladed craft knife, I held the flexible mold in my left hand and gently tented it so that without disturbing my molded leaf, I made the edges of the flexible tray bend ever so slightly away from the mold I was actually using! Then with a straight blade held on a flat plan, parallel with the surface of the mold, I carved the clay away from the edges of the mold precisely where the clay meets the edge of the mold. This worked perfectly and the resulting leaf was everything that I could have hoped for. As the mold is flexible (I keep reiterating this flexible part, cause if you try this with a rigid mold, I doubt you will have the same degree of success) I was able to very easily unmold the leaf, add some garnish of mica and pop it into the curing oven!
If you have been dodging some of those very elegant leaves and things because you had little confidence that anything lovely could happen with that type of mold, I hope this opens up new and exciting opportunities for expressing yourself!!! Thank you for visiting! ................Mona
Monday, March 27, 2006
Wednesday, March 15, 2006
Answer to Technical Questions on creating Polymer Cuff Bracelets
I received a few questions today from a jewelry designing peer regarding my previous post on polymer cuff bracelets.
The questions were:
Hey Mona, couple of questions for you on this (beautiful bracelets, BTW!)
first, did you place anything between the raw polymer and the cuff itself
before baking? To make sure it stays adhered? Second, the sponge you used,
what kind was it? I know most of my normal sponges have a very hard/stiff
texture unless they are wet down. Then I have sea sponges which are a little
softer to begin with, but a very uneven texture. So I'm curious as to the
texture of the sponge before you dipped it in the future.
The Answers Plus a Bit More/including at home Gold Plating for Cuff Interiors:
At the craft store I purchased a small bag of watercolor sponges. The bag contained 2 each of fine pore silk sponges, synthetic hydrophilic sponges, and coarse sea sponges. I used one of the fine pore silk sponges.
While I was curing the polymer I didn't use anything between the brass cuff and the polymer. After the polymer was cured and still hot, I took it directly from the oven to a dunk of cold water in a sink. This is supposed to make the colors more vibrant.
I haven't tried letting the polymer come to room temperature slowly, so cannot confirm this, but love the results I am getting, so will continue to manage the polymer with a cold dunking. After the polymer was cool and dry I removed it from the bracelet blank. With fine grit sand paper I cleaned the bracelet blank of any residue from curing, then rinsed it and wiped it dry.
Going back to my desk, I placed a very sheer coating of E6000 glue on the bracelet blank and also on the back of the polymer, then let both rest, separated for a few minutes, according to manufacturers instructions for the best and strongest bond. Finally I reapplied the polymer to the bracelet and sort of rolled it down onto the blank with my fingers from one end to the other with firm pressing strokes. This was very easily achieved.
Update on the finishing:
Ages ago I purchased a gold plating kit from Caswell Plating They are located online at caswellplating.com.
The kit is for 24K Gold plating. I sanded the inside of a brass bracelet blank to make sure it was good and clean, wiped the inside down with a soft rag and alcohol to make sure no fingerprint residue remained, and proceeded to try the kit this afternoon. What I got was a nice laydown of 24K Gold on the interior of the bracelet blank. I still need to buff the inside for a nice finish, but what I am looking at right now is pretty nice! This is the way I plan to finish all of my bracelets so that the brass bracelet blank won't leave green marks on the skin and I have a finish t hat will be long enduring and of beautiful. quality. You can see in the picture that the interior surface of the bracelet blank is a nice rosey gold in contrast with the exterior surface of brass.
When I bought the kits they looked so rudementary and unimpressive that I hadn't tried them yet, but with the new bracelets I am turning out with the polymer, I wanted to create a truly quality item and decided to drag out the plating kit and see if it really was worthwhile or just a hoax! The kit cost about 46 dollars and I bought the first one on ebay from this company, then later figured that the kit probably wouldn't coat very much metal, so even bought another one. I filled the cap from the plating solution full(it's a small cap) and had enough solution to plate the inside of 5 bracelets with a width of 2 inches, so the stuff really works, is economical, at least from my standpoint, and provides a practical solution for my desire to create a fine quality
finish on my designs without having to send stuff out for plating!!!!
Hope this has all been helpful for you!
The questions were:
Hey Mona, couple of questions for you on this (beautiful bracelets, BTW!)
first, did you place anything between the raw polymer and the cuff itself
before baking? To make sure it stays adhered? Second, the sponge you used,
what kind was it? I know most of my normal sponges have a very hard/stiff
texture unless they are wet down. Then I have sea sponges which are a little
softer to begin with, but a very uneven texture. So I'm curious as to the
texture of the sponge before you dipped it in the future.
The Answers Plus a Bit More/including at home Gold Plating for Cuff Interiors:
At the craft store I purchased a small bag of watercolor sponges. The bag contained 2 each of fine pore silk sponges, synthetic hydrophilic sponges, and coarse sea sponges. I used one of the fine pore silk sponges.
While I was curing the polymer I didn't use anything between the brass cuff and the polymer. After the polymer was cured and still hot, I took it directly from the oven to a dunk of cold water in a sink. This is supposed to make the colors more vibrant.
I haven't tried letting the polymer come to room temperature slowly, so cannot confirm this, but love the results I am getting, so will continue to manage the polymer with a cold dunking. After the polymer was cool and dry I removed it from the bracelet blank. With fine grit sand paper I cleaned the bracelet blank of any residue from curing, then rinsed it and wiped it dry.
Going back to my desk, I placed a very sheer coating of E6000 glue on the bracelet blank and also on the back of the polymer, then let both rest, separated for a few minutes, according to manufacturers instructions for the best and strongest bond. Finally I reapplied the polymer to the bracelet and sort of rolled it down onto the blank with my fingers from one end to the other with firm pressing strokes. This was very easily achieved.
Update on the finishing:
Ages ago I purchased a gold plating kit from Caswell Plating They are located online at caswellplating.com.
The kit is for 24K Gold plating. I sanded the inside of a brass bracelet blank to make sure it was good and clean, wiped the inside down with a soft rag and alcohol to make sure no fingerprint residue remained, and proceeded to try the kit this afternoon. What I got was a nice laydown of 24K Gold on the interior of the bracelet blank. I still need to buff the inside for a nice finish, but what I am looking at right now is pretty nice! This is the way I plan to finish all of my bracelets so that the brass bracelet blank won't leave green marks on the skin and I have a finish t
When I bought the kits they looked so rudementary and unimpressive that I hadn't tried them yet, but with the new bracelets I am turning out with the polymer, I wanted to create a truly quality item and decided to drag out the plating kit and see if it really was worthwhile or just a hoax! The kit cost about 46 dollars and I bought the first one on ebay from this company, then later figured that the kit probably wouldn't coat very much metal, so even bought another one. I filled the cap from the plating solution full(it's a small cap) and had enough solution to plate the inside of 5 bracelets with a width of 2 inches, so the stuff really works, is economical, at least from my standpoint, and provides a practical solution for my desire to create a fine quality
finish on my designs without having to send stuff out for plating!!!!
Hope this has all been helpful for you!
Tuesday, March 14, 2006
Getting a Finer Finish on Polymer Cuff Bracelets
If you have read my first entry, you will see that my work is very diversified. Subjects will change depending on what type of work I am doing on any given day and sometimes more than one medium is working on the same day!
For this post I would like to share an experience I have had in trying to get a really fine finish on a wide polymer cuff bracelet.
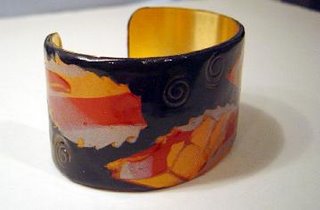
Several weeks ago I purchased a large bulk of very wide blank brass cuff bracelets. These make fantastic bracelets when covered in custom blended or ornamented polymer. I made a couple in the past two days. Using "Future" liquid floor wax is pretty much a standard for getting a very durable protective sealant coat on polymer. The finish is very strong when matured and never yellows, lending to long enduring beautiful finish. Usually this is applied in mutiple layers with drying time between each coat. I was using a broad soft brush to apply the sealant to these new bangles and ran into all kinds of trouble getting a beautiful even finish! Mind you, this brush is very similar to what I use on all of my smaller polymer work with no difficulty at all! Here is the problem:
The bangle is large and oval. Future dries fast! By the time you are half way around the bracelet with even a large brush, your sealant is beginning to dry before you can finish your coat full around! This leaves uneven lines of demarkation where your first sealer went down and where your new sealer started, and if you try to go back and touch up, the situation becomes even worse. I was working very fast with my broad brush and still couldn't get my coat down fast enough to beat the drying time and distortion dilemma.
After an hour of putzing around trying to get my coat even and never achieving the beautiful finish that I was trying for, I finally dug out a bag of sponges from a drawer under my desk and chose the largest one that had a
fine, even, texture. Next I poured some future into a demitasse saucer(very small saucer) next to my work station, dipped in the sponged very slowly and dragged it against the edge of the saucer as I came away to remove any bubbles clinging to the sponge. This is the good part! With one smooth long stroke, the sponge applied a perfect even coat of sealant over the surface of the bracelet.. The layer of sealant was perfection. No bubbles, no running, and delivered a glass-like surface finish. I have eight hours of drying time on these babies but will post pictures tomorrow evening! The bracelets are very different in every way except for their basic shapes.
I achieved a very pretty mica shift on one of them and will hopefully be able to catch that with the right lighting so that you can see what mica shift is!
Thought for the day:
An artist does not create art. Art finds a soul willing to be used as a portal and spills forth. There aren't nearly enough volunteers!!!! Dream something, create something,.............anything! All things are possible with a willing heart and the help of a good friend. Will be back with pictures tomorrow! G'Night! ----------
M
Okay Here are the pics I promised!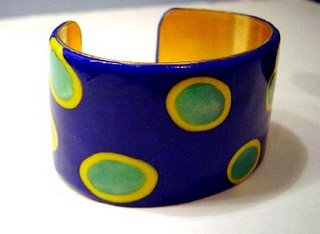
For this post I would like to share an experience I have had in trying to get a really fine finish on a wide polymer cuff bracelet.
Several weeks ago I purchased a large bulk of very wide blank brass cuff bracelets. These make fantastic bracelets when covered in custom blended or ornamented polymer. I made a couple in the past two days. Using "Future" liquid floor wax is pretty much a standard for getting a very durable protective sealant coat on polymer. The finish is very strong when matured and never yellows, lending to long enduring beautiful finish. Usually this is applied in mutiple layers with drying time between each coat. I was using a broad soft brush to apply the sealant to these new bangles and ran into all kinds of trouble getting a beautiful even finish! Mind you, this brush is very similar to what I use on all of my smaller polymer work with no difficulty at all! Here is the problem:
The bangle is large and oval. Future dries fast! By the time you are half way around the bracelet with even a large brush, your sealant is beginning to dry before you can finish your coat full around! This leaves uneven lines of demarkation where your first sealer went down and where your new sealer started, and if you try to go back and touch up, the situation becomes even worse. I was working very fast with my broad brush and still couldn't get my coat down fast enough to beat the drying time and distortion dilemma.
After an hour of putzing around trying to get my coat even and never achieving the beautiful finish that I was trying for, I finally dug out a bag of sponges from a drawer under my desk and chose the largest one that had a
fine, even, texture. Next I poured some future into a demitasse saucer(very small saucer) next to my work station, dipped in the sponged very slowly and dragged it against the edge of the saucer as I came away to remove any bubbles clinging to the sponge. This is the good part! With one smooth long stroke, the sponge applied a perfect even coat of sealant over the surface of the bracelet.. The layer of sealant was perfection. No bubbles, no running, and delivered a glass-like surface finish. I have eight hours of drying time on these babies but will post pictures tomorrow evening! The bracelets are very different in every way except for their basic shapes.
I achieved a very pretty mica shift on one of them and will hopefully be able to catch that with the right lighting so that you can see what mica shift is!
Thought for the day:
An artist does not create art. Art finds a soul willing to be used as a portal and spills forth. There aren't nearly enough volunteers!!!! Dream something, create something,.............anything! All things are possible with a willing heart and the help of a good friend. Will be back with pictures tomorrow! G'Night! ----------
M
Okay Here are the pics I promised!


Sunday, March 12, 2006
Introducing Mona Designs

Welcome to Mona Designs..... Where color, texture, light, dimension, and mechanical composition evolve from moment to moment in an exciting and experimental way!

Most days you will find me in a pair of well worn jeans and a cotton t-shirt because they are don't flame up if hot glass pops onto them. Hair in a pony tail and a furrow of concentration between my brows, I concentrate on lots of small details and the safety aspects of my work.
An Introduction to My Multi-Media Approach:
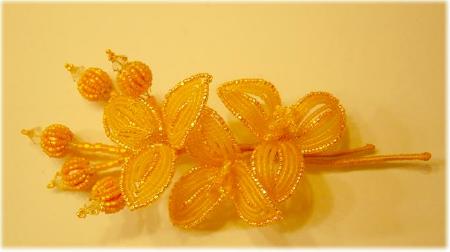
The "Pear Corsage Brooch", seen above, is an excellent example of how I mix media to produce original wearable art. The leaves and flowers are a combination of Russian and Venetian beaded work. Tiny glass beads are worked with wire to produce floral components. The glass pears are a product of lampwork at my torch. Combined, these elements fulfilled the dream of a client residing in England.
The piece of work measured about 4 inches in height. The pear blossoms and leaves have an intriguing, slightly posable quality. This allows the wearer to adjust, to a minor degree, position of the components. A pin clasp is mounted at back, and high in the composition. This allows for balance and also for ease of use for the wearer. Contrast in color, texture, and dimension bring hot glass and beaded work together in a lovely and exciting way. I accept commissions for this type of work! It takes weeks to design and produce a piece of this type of work. The pear brooch sold by commission for two hundred and fifty dollars.
 This particular design, "Kumquat Fantasy", is a combination of French and Venetian beaded work combined with Austrian Crystal elements. This piece now resides in Florida and was purchased by a world renown jewelry designer. Working in a monochromatic palette(same color family), the tension of excitement comes from use of different textures (or perceived textures) in glass, combined with faceted crystals, to satisfy the eye's need to find symmetry, texture, color, and dimension. Matte and shiny textures combined in shades of tangerine, outlines of iridescence, juxtaposed to matte textures, ....you get the idea by now I am sure! The eye demands to be entertained. When the eye perceives it's view as deficient in any aspect...one becomes intellectually bored and the design falls short of making a connection with the viewer. The work of a designer must entertain, in a complex multi-level way, regardless of the medium or the design fails.
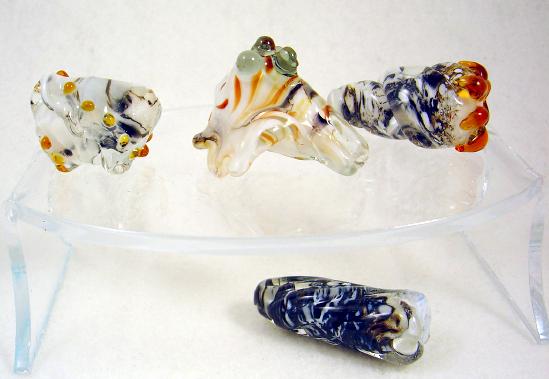
Lampworking Intro:
I have been working hot glass for about three years now. I have a kiln and a dual gas (Oxygen/Propane) torch setup. Glasses I use are imported Italian glass primarily from the Moretti line of glass. I keep a small inventory of Bullseye glass as well for the special colors. Although I am self taught, I am well read in the field and have lots of hours at the torch invested in my experience! The four shells were a great accomplishement for me! They are all larger focal sized shells. Learning to work color, texture, and dimension into hot glass is much more difficult than working those elements into any other medium.
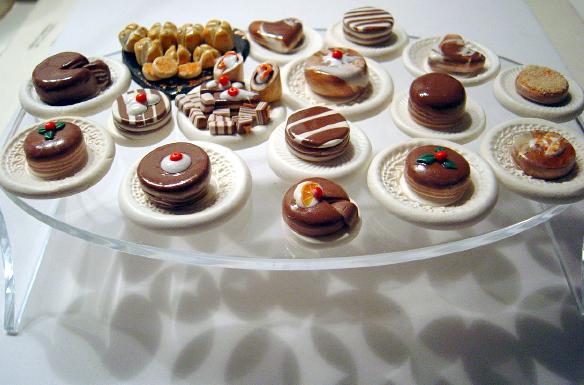
Introduction to Polymer Clay Work:
A couple of months ago I began to experiment with polymer clay as potential components for my design work! There are some artists in my jewelry designing group who do wonderful polymer work and those artisans stimulated my interest to the degree that I had to take the plunge! Small brooches seen here are created with foiled polymer, then ornamented with caviar and crackers on one. Gouda cheese, grapes, and bread ornament another. A large collection of pastries and sweets on display here are all being prepared to produce more "Faux Food" wearable art jewelry! All that you are viewing are completely created of polymer. The shield brooch, at left, is four inches in length. It is a joy and a pleasure to work with Polymer Clay. If you are not familiar with this particular medium try a Google search on it! Articles depicting use of this medium in designing jewelry are appearing in fine publications such as, "Lapidary Journal" and "Art Jewelry". Polymer is making it's mark on the timeline of jewelry history. You really want an opportunity to experience this!


A link to my portfolio site is listed in the "About Me" section. There you can view many other designs in a wide range of mediums. I hope you find your visit stimulating as well as entertaining,!
Please fill free to leave comments or questions! Every effort will be made to give you the benefit of my experiences! Sincerely, Mona
Subscribe to:
Posts (Atom)
